Showing posts with label easy. Show all posts

Thursday, February 20, 2014

Easy Beef Tips

I have this specific recipe in my slow cooker right now. I'm waiting for my daughter to let me know if she wants mashed potatoes or egg noodles so I can have it ready when she gets home. I'll be going out to dinner with a friend. I want to taste this before I go. I've been wanting to make it for a long while.

The recipe calls for 2-2.5 pounds of beef, but I had only bought 1 pound from our tiny full-service grocery. I like them because they have a real butcher. Everything is cut fresh and this meat had been run through a grinder with very large holes, so it was perfect for beef tips. It was like thick strips of meat, but they were round because of the grinder. Because I didn't have the ingredients to make it right away (I was actually thinking of making pepper steak when I first bought the meat), I had triple wrapped it and put it in the freezer. I took it out yesterday and thawed it and today I put it together in the cooker.

The slow cooker I am using has a removable pot, so I was able to brown the meat right in the same pot it would be cooked in, so no need to dirty a bunch of pans. The small bowl and container I used to make the gravy and flour the meat are easy to clean, so I'm not too worried about those.

So, if you made this, what would you eat it with? Mashed potatoes? Egg noodles? Or rice (which my daughter won't touch, so I didn't ask her about that)?


Here is the link to the recipe: recipesthatcrock.com/slow-cooker-beef-tips-gravy/

Credit for photo belongs to the website where I got the recipe: www.recipesthatcrock.com.


Monday, February 18, 2013

Stuffed Cinnamon Rolls by Flour Me With Love

Flour Me With Love: Stuffed Cinnamon Rolls

I wish I could tell you I made this and how outstanding they are, but I haven't and I can't. I can only say that they look fabulously outstanding!! 


I'm not into sweets all that much. Haven't been since around 5th grade or so. But, there are times when something like this just screams at me so loudly that it's almost impossible to ignore. I am fortunate that I cannot currently afford to go buy the ingredients for this because, as a diabetic, it's probably not the wisest food choice for me to make. But, I do love cinnamon and I do love cream cheese and I do love doughy treats and this is all that and more!!!

I would recommend heading on over to this web site and checking out this really quite easy recipe (the filling is the only thing you actually need to make yourself) and get to work trying this for yourself!!

Meanwhile, I need to figure out what I'm going to make for supper and get some dishes washed. I hope you enjoy eating this as much as I am enjoying dreaming about it! LOL

Monday, January 2, 2012

For Shame!! Making Promises I Didn't Keep!!! (Chicken Paprika recipe)

Wow - I've really been lax in keeping up with this blog, even though I've apologized and promised to try to do better. Shame on me!! I haven't given up, but when my get-up-and-go got up and went, it done got lost!!!


But, I'm still here and I still want to keep this blog alive, so I do hope you'll hang with me in this not-so-grand effort of mine. I mean, I'm ALWAYS talking food, be it on Facebook or at home or in emails or wherever. What's NOT logical about having a foodie blog where I can do what I'm already doing??


Anyway, I was at the Goodwill a week ago looking for a chair to replace the chair my friend broke - and I do mean broke! It was from the 60s and had come with a desk that we'd given away three years ago. My daughter had put screws in all the joints to reinforce them because it was the noisiest chair to sit in with the squeaking and creaking. So, while she was in Utah, my friend would go on my daughter's computer while I typed up his college assignments. I could always tell when he was there (or when anyone was there) because of the chair's constant complaints. Well, this one day I heard him thrashing about making the chair cry out in agony (squeaking and squawking more than usual), so I hollered up the stairs for him to stop before he broke the chair. About 15 seconds later, I heard it again and this time the chair did more than cry out in pain - it literally screamed. In other words, I heard a loud, thunderous CRACK!! I hollered again and told him he was breaking the chair and to get downstairs since he wasn't able to use it properly. He replied that he wasn't breaking the chair - and then silence. Shortly, a subdued friend began to descend the stairs and when his head cleared the ceiling, he said, "I broke the chair."


When I took a look at it I found that he hadn't broken apart any of the joints - he had LITERALLY broken the wood, splitting the back support away from the seat making the chair unfixable (without a lot of glue and braces being added). UNBELIEVABLE!!! I told him he owed her a chair. That was Friday. By Tuesday, he still hadn't begun looking for a chair and she was scheduled to come in Tuesday night. He kept offering to loan me a chair which I had told him already more than once was not sufficient. He'd found excuses every day (not counting Christmas) for not going to look and I'd had enough. So I went to Goodwill.


I found a perfectly good chair that day, fully padded on the seat and back and only $3. So, I got it. But, I'm not one to go into a thrift store and NOT look around, so I went through my favorite departments to see what was what (jeans, household items, books) and found a neat little paperback cookbook called Potluck Cookery by Beverly Pepper. A quick flip-thru showed me that I would like the recipes therein, so I bought it.


After finding several recipes I wanted to try, I thought about sharing them with all of you, but wanted to see if anyone out in cyberspace had ever made them and had images because, quite frankly, that's easier than making them myself - and it helps me know if the recipe looks as good as it sounds. That's when I learned that my little paperback, despite its well-kept appearance, was actually printed in 1955! I knew it looked vintage (as I am also beginning to, unfortunately), but it was in such good condition, it never occurred to me it was over 50 years old!! Nice!!!


So, even though I haven't made anything yet, I wanted to share with you the first recipe that caught my eye and a picture that links to another blogger who actually made several recipes from this little book. I suspect that her version looks different than mine will but, it's a start.


"Chicken Paprika"
Potluck Cookery by Beverly Pepper, pg. 72
I happen to like Chicken Paprika with its saucy paprika gravy and buttery egg noodles, but I think it would work equally well over rice. This blogger used brown rice and green beans which makes it look entirely different than I had imagined. She admits having burnt this which altered the color of the sauce, so there's another reason for it to not look quite like I expected. I still think I'm going to try it, though, because it's a very easy recipe and because you can use either leftover chicken or some that you've cooked special for the dish. Of course, if you have leftover turkey, that works, too.


Chicken Paprika
LEFTOVER: Cooked chicken
At least 4 slices or 1 ½ cups
AND
Fat, 2 tablespoons
Sliced onion, 1 large
Paprika, 1 tablespoon
Egg yolk, 1 beaten with 1 cup sour cream
Salt and pepper to taste
Sauté onion in hot fat until golden brown. Add chicken and paprika. Cook 5 minutes. Add egg yolk-sour cream mixture, salt and pepper. Simmer very slowly 10 minutes.
Serves 3 – 4
SUGGESTED: Serve on buttered noodles with Mushroom Croquettes and buttered rye bread slices.

Friday, July 15, 2011

Fast and Easy Burritos

I decided to make burritos tonight using the tortillas and cheese I had bought at Dollar Tree (it's actually a cheese substitute, but for a buck, I can handle using it for cooking). I just haven't felt up to cooking these days, although I have cooked more this last week than I have in a while. Whether it's the heat or something else, I don't know.

Anyway, I was sure I had refried beans in the pantry, so I thawed the ground beef and went to get the ingredients out. Uh oh! The meat is browning, but there are no refried beans to be found. So, I took the two cans of pinto beans I also had and used them, mashing the beans with the potato masher I also use to break up the ground beef in the pan. I then poured a cup of salsa in and about a cup of Mexican cheese shreds. I use mild salsa, but you can up the ante with medium or hot if you prefer. You can also add leftover rice (Spanish rice would work well) if your family enjoys rice. I stick to the tried and true when I'm feeding my daughter. It's just easier that way.

I put the tortillas in the microwave and heated them for about 45 seconds, but it's probably best to put them on a flat griddle to heat. As soon as they start to puff, they're ready. Don't let them get crispy. You just want them soft.

Now, I didn't prepare anything else to go with this. My daughter likes shredded lettuce and diced tomatoes, but we didn't have lettuce and I don't like tomatoes, so she can dice her own tomato. I like them just as they are - hot, cheesy beans and meat slathered on a soft flour tortilla and rolled. It's a wonderful and filling dish.

You can also use this mix as a hot dip if you want - keep it in a small slow cooker to stay warm and soft. Adjust the ingredients to make it more "dippy", to your taste. In fact, that's how I discovered this burrito filling. I was at a party where it was served as a dip. I found out what was in it and tried my hand at home. It was a success with my kids and their friends (whenever I had it, I also had Court and Tara on hand, too.)

As I was saying, though, this is a very flexible recipe. Some add corn or rice or diced green chilis. Some have more meat than beans. Some use beans only. Others keep the beans separate from the meat. I might try corn one day since that's a family favorite, but I prefer the one pan concept, so I'll stick with the mixture rather than separate the ingredients.

A dip that looks very much like my burrito filling - found at Recipe Girl.

Wednesday, July 13, 2011

No Boil Baked Ziti (actually, Rotini) DELICIOUS!!!!!

I recently tried a recipe for No Boil Macaroni and Cheese that turned out pretty well other than it was a bit too al dente. It's still worth it because I'll just add more liquid the next time I make it.


But, I had a box of tri-color rotini in my pantry I wanted to use along with some ricotta, shredded mozzarella and spaghetti sauce. I went looking for a recipe for no-boil rotini, but wasn't successful. However, I did find a recipe for no-boil baked ziti that I decided to try figuring my pasta would replace the ziti approximately one-for-one.


My problem was that my box of rotini was 12 oz and the recipe called for eight ounces. Plus, my rotini seemed smaller in diameter than ziti would be, so I wanted to be sure what came out of the oven wasn't too runny or too thick and that the pasta was cooked all the way through.


Holy cow! What I got turned out to be the BEST baked pasta I'd ever had!! I've had some that the ricotta seems to dominate and the pasta sauce gets lost. I've had others that add nutmeg to such a degree that it isn't just an accent, but a primary flavor. I was hoping to avoid either one of those extremes. 


One of the ways I tried to do that was to add some additional spices to the mixture to keep it from being too cheesy. Fortunately, I was successful. 

Now, I'll share with you the recipe I used with notes showing what changes I made and where. I really think you'll be pleased with this recipe. It takes only five minutes to prepare!


The thing I liked best was that it didn't heat up the whole house. There was heat from the oven, but if I had done both boiling water and the oven, it would have been very uncomfortable. Since we don't eat in the kitchen, this worked well for a summer meal.


No Boil Baked Ziti

Prep Time: 5 minutes
Bake Time: 60 minutes
Serves: 8

1 26 oz jar pasta sauce (I used a can of Hunt's meat flavored)
1 1/2 cups water (I added more water, maybe 1/2 cup or so)
15 oz ricotta 
1/4 cup grated parmesan (I left this out - just sprinkled some on top near the end)
2 cups shredded mozzerella
8 oz uncooked ziti (I used 12 oz of tri-colored rotini which is why I added more water)

Preheat oven to 400 F.
Combine sauce and water.
Stir in ricotta, parmesan, and 1 cup mozzerella.
Add uncooked ziti. (I also added about 1/2 tsp each of Italian and Pizza spice blends.)
Spoon ziti mixture into 13x9" baking dish.
Cover with foil and bake 55 minutes.
Remove foil and sprinkle with remaining mozzerella. (This is when I sprinkled the parmesan, too.)
Bake uncovered for 5 minutes. 

Friday, July 8, 2011

Beer Baked Chicken ~ Tried n' True Recipes Blog


I decided to thaw some chicken leg quarters and find a recipe that was easy to put together and might use some of the beer my daughter had left over from last weekend. I found this recipe on the Tried n' True Recipes blog (which wasn't easy with so many Beer Can and Beer Butt chicken recipes out there). There were beer-braised chicken recipes galore, but there were none whose images drew me in. Most looked more like stew and I didn't want something on top of the stove in this heat and humidity.

I actually found this one by looking on Google images. The picture looked great, so I went to the recipe to check it out. I had all the ingredients except the rosemary, but it allows for that. That sealed the deal. Easy to throw together and in the oven, not on top of the stove. Perfect!

The only "problem" I had was that I was using two chicken leg quarters and not 18 legs, so I cut back on the ingredients quite a bit. I also took the skin off, so to compensate, I dried the chicken and smeared sour cream over the meat and then added the same seasoning to the sour cream that was blended with the beer. I used slightly less than a half can of beer, but if you're hesitant about using beer, I would try either chicken or vegetable broth. The taste will be different, but not bad.

The recipe calls for baking for 2 hours, but I baked for an hour with foil over the chicken and 30 minutes with the foil removed. The meat was fall off the bone tender and moist. I was pleased with how it turned out and wouldn't be afraid to do it again, other than I'll cut back just a little on the mustard. It added a pungency that we would rather not have. But, that doesn't make the recipe bad. It would be good without it, too. I served this with "baked" potatoes (aka microwaved) and am very happy with it.

I'll admit I enjoyed the mac n cheese recipe more, but that's a personal preference issue. I like BOTH recipes because they are throw together easy and get popped into the oven with little mess and no steam adding heat to the kitchen. I would recommend either one for ease of preparation and because they're worth making even in summer.

Thursday, July 7, 2011

No-Boil Mac & Cheese by Plain Chicken

Plain Chicken: No-Boil Mac & Cheese: "This was the best traditional baked mac & cheese we've ever made. It was SO simple and SOOO delicious! The best part about this mac & che..."

These are the first words you'll find in Plain Chicken's blog entry for this absolutely wonderful recipe. I haven't cooked much in a while, as you have noticed, I'm sure. But, when I saw this recipe and knew I had pretty much all the ingredients (and knowing that I LOVE macaroni and cheese), I just HAD to make it. Of course, it was after 9:00 when I began, but I've never been much of a clock watcher when it comes to eating, so when the mood strikes, I follow it.

I am so glad I did. First, let me tell you of some adjustments I had to make out of necessity. The first was the cream cheese. I had none. And, I didn't have money to buy any. But, I had ricotta on hand, so guess what? I used ricotta cheese. Secondly, I didn't have four cups of cheddar cheese. I had about three cups of Mexican blend cheddar and Jack plus shredded Mozzarella. Guess what again? I used it! Thirdly, I didn't have onion salt. Instead, I used dried minced onion. It turned out just fine. Lastly, I added more liquid because it just seemed like it needed it. I was right. But, that could be just me, so follow the recipe the first time and make that decision for yourself.

The thing I loved most of all about this was that it was all thrown together into one dish (or, in my case, two dishes since I didn't have a single dish big enough) and put into the oven. No pots of boiling water heating up the already warm kitchen from this summer heat, no pots coated with sticky cheese sauce that would then be poured over the already cooked macaroni, and no major mess in the kitchen. I did use a large bowl to mix everything because of the already mentioned lack of a large casserole dish, but since nothing is baked into it, it's easy to clean.

I will say this, though. Be sure to add the flour BEFORE you add the cheese and macaroni. It will be easier to blend into the liquid that way. Despite that, it turned out wonderful!

Now, I'm a big fan of easy, so I am absolutely thrilled with this recipe and that it turned out so well. It's obviously flexible or it wouldn't have turned out so well with the adjustments I made. And, it's so much easier to put unboiled macaroni in than it is to know when it's reached the al dente stage. In fact, it wasn't until I made no-boil lasagna that I finally had a wonderful firm pan of lasagna that didn't slip-slide away while it was being cut, so I'm a huge no-boil fan. And, trust me - you don't need no-boil pasta to make a no-boil recipe. That's just an added expense that's unnecessary. I just make sure there's enough liquid for the pasta to absorb while it's cooking - which is what this needed for me. I think it's because I used two smaller casserole dishes instead of one large one. I probably should have reduced the cooking time, but no matter. I'm just so happy with how it turned out.

Don't be afraid to try this one. It'll be worth it!

Wednesday, June 15, 2011

Best Laid Plans

In yesterday's post, I said I would be cooking chicken today because it was going to be a cool day. Well...it WAS a cool day, but I slept half of it away. I don't know why - I just couldn't stay awake. Eventually, though, I did decide to cook and, as is often the case when I make plans in advance, I didn't cook chicken. 


I went rooting to see what we had, thinking we might have a meal "kit" on hand that I could use the chicken with, but instead I found Hamburger Helper Four Cheese Lasagna. I knew I had hamburger in the freezer, so I got a pack out and put it in the microwave to thaw. I also got a can of corn and a can of peas out to add to the dinner along with the meat, noodles and sauce packet. It was far from gourmet, but it met the need and tasted reasonably decent. I added ketchup to mine, but that's a personal thing. 


There is enough left that my daughter can take some to work for lunch and I can have some for breakfast instead of the chocolate Malt-o-Meal I've been eating. But, then, I might still have the Malt-o-Meal and have the Helper for lunch. I'll decide tomorrow.


You know, there's really nothing wrong with Hamburger Helper. It's true that all processed foods (or almost all) are high in sodium, but if you want something quick that tastes fairly decent that you can tweak here and there, it's not a bad way to go. And, there are plenty of off-brands out there that match it pretty well in quality, so it's nice to have a few tucked away for a day when you just have no creative juices flowing. It comes together quick and can be changed up with ground chicken or turkey - or even ham. I'll never turn my back on Hamburger Helper.

Friday, April 22, 2011

Stuffed Pork Chops - This One's a Keeper!

A few days ago, I took a bag of chicken breasts out of the freezer to thaw because I thought I would make a chicken breast recipe I had seen. When the breasts thawed, I learned that they weren't breasts at all, but were boneless pork chops (I guess they really are "the other white meat"!) Well, I didn't have a clue what to do with them since I hadn't planned on them, so I put them in the fridge thinking I'd make them the next night when I had time to decide how. The next night came and went with my daughter going out and not being here for supper. The night after that as well. By then I had found the perfect recipe, but needed to buy stove top (style, not brand) dressing since I didn't have any like I thought. Today was the finally the day that these pork chops were going to be made.


The recipe called for the chops to be pounded, which was unusual. That's usually done for scallopini or cutlets. I've never seen that for stuffed chops before. I got the wax paper out, laid the bottom sheet down, placed two chops on the paper and laid the top sheet over them. Since I still don't know where my mother's meat mallet is, I decided to use my heaviest sauce pan to pound them. I've got to say, it does pretty darned well! After pounding the two (pulling off the excess fat), I set them aside and pounded the third one. Then I made the stuffing. Love it. It takes all of five minutes. That's not to say I don't like homemade stuffing. I make it and I do pretty well, but I don't always want to have celery and onions on hand or a lot of extra bread to use to make it. Plus, that would make too much and it would be drier than the stove top kind. So, I got the stuffing made and put two small scoops on each chop. These weren't the biggest chops, so as I rolled, the stuffing made its escape out the ends. Ugh. But, I didn't let it stop me. I just took my toothpicks (in lieu of the twine the recipe called for that I didn't have) and skewered the chops together around the stuffing and then shoved the escapees back in the ends. The third chop was an odd shape, so it ended up looking like a 3-point Minuteman hat when I was done skewering it (but that actually kept more of the stuffing inside doing it that way). 


Stuffed and overflowing
One by one, I placed them in the baking dish (I didn't grease it). I put fresh ground salt and pepper over the chops and then filled all the empty areas around the chops with the remaining stuffing. I sprinkled poultry seasoning over top of everything and added a little chicken broth as well (to keep the stuffing from drying out.


Ready for the oven
I turned the oven on to 350° and put the baking dish in after covering it with foil (to also keep it from drying out or getting to crusty - it's a personal thing. I hate crunchy stuffing.) I took the foil off 45 minutes later and left the dish in the oven for about another 10 minutes. 
Cut in half and tender
I can only say that the one I ate was amazing! Seriously amazing. I often joke that I can tell when something is done when the smoke alarm goes off because cooking just isn't my forte (despite my love of all things kitchen or recipe related). I'm not a bad cook; I'm a lazy cook. I can think of hundreds of things I'd rather do than stand over a stove, and I usually do at least one of them. But, let me put it in the oven or in a crockpot and give me permission to do something else in the meantime and I do pretty well. Today was one of those days. The pork chop was tender and moist, the stuffing was perfect (I'm thinking of adding apple the next time for a touch of sweet), and the poultry seasoning really put it over the top in my book. 


One down, two to go
By the way, if you're ever near a Dollar General, buy their chicken stuffing mix. It was $.85 and it is fantastic! You can actually see and taste the bits of onion and celery in the mix when it's done. Best value for the price I've seen yet! They didn't slack off on taste at all.

Wednesday, April 20, 2011

Quick & Easy Meals We've Eaten Through The Years

I did Meals in Minutes recently, but that was more ease of preparation than how soon they'd be ready to eat. I'd like to share with you some meals we've made frequently through the years that don't take long to put together or finish.


The first one is one my ex had me make after we were married. It wasn't anything I'd ever seen before and I did have my doubts about it. But, you know it's really pretty darned good. It doesn't really have a name, so we call it:


Green Beans and Meat


A similar-looking Cuban recipe still in the pan.
All you need is a pound of hamburger, a can or two of green beans and a 15 oz can of tomato sauce. Brown the meat, add the green beans (my daughter likes French style best) with one can undrained and add the tomato sauce. Meanwhile, fry some potatoes - in fact, you could start the potatoes first if using fresh potatoes. You could also use O'Brien style (cubed) hash brown potatoes or even French fries. Once both things are cooked, we're ready to eat and that's usually in less than 30 minutes.


Another one I like that my mother used to make is:


Ham, Green Beans and Potatoes


Green Beans and Ham - PA Dutch recipe
Now I know where my mother got the idea to put vinegar on her green beans.
This would work for after Easter if you have a large piece of ham left from Easter dinner. Put the ham in the pot along with peeled quartered potatoes and a pound of green beans (preferably fresh or frozen) and cook until the potatoes are cooked through and the meat is hot. The potatoes and green beans will be flavored by the ham and the ham will be heated by the cooking process. Eat the potatoes like you would baked potatoes.


Meat Pie


Spicy Beef Stew
An example of what would work in a meat pie.
I mentioned this in yesterday's post. You could call this "stew pie" because it is made from leftover stew. I have deviated from this in that I have bought a tall can of Dinty Moore stew and a pair of frozen deep dish pie crusts, filled the bottom crust and used the second crust for the top. If you're more adept at crust making than I am and have a large family-sized pie plate, you can make a heaping helping of pie to feed your family (one small pie is enough for three people). This is a great way to use leftover stew. Serve with fruit on the side and maybe a salad.


Meat Sauce for Spaghetti from leftover Pot Roast (or steak)


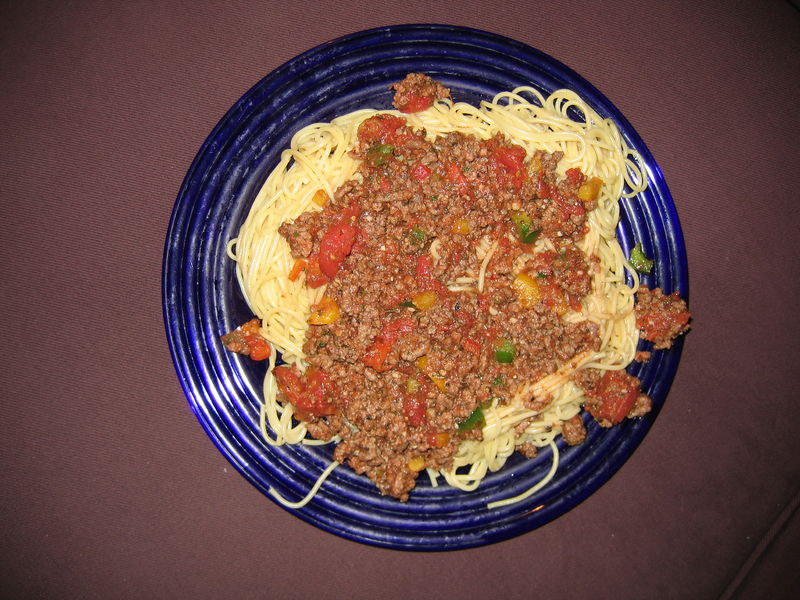
Spaghetti with Meat Sauce -Wikimedia Commons
I've done this several times. If you have a food processor or a meat grinder, run your leftover meat through to a small grind or mince (cut up into smaller pieces so the processor can handle it). When you have lots of minced meat, put your spaghetti sauce together in the pot as you normally would and add the meat to it. The seasonings of the meat will add flavor to the sauce as will the meat itself and it will be wonderful and meaty! 


Chicken Fingers


The method I used to fry mine, but another blogger's recipe.
When I was caring for my mother, I tried to give her variety, meet her wants as well as her needs and get her to eat chicken more often (she would have lived on beef if she could). She liked fried foods, but was supposed to cut back because of cholesterol. One breast of chicken was too much for her to eat, so I decided to try something new. I was already pan frying some things for her using light olive oil. I had also bought some lemon pepper marinade. So, I took a single chicken breast, sliced it across the grain into multiple pieces, dipped those pieces into the marinade and then into bread crumbs. While vegetables were heating up on the stove, I pan fried those pieces in olive oil to give her the texture she wanted with the healthiest oil I could use without actually deep frying. This turned out wonderful! Not only did we have enough pieces to feed my mother and me, but my daughter stopped by and had some as well - just from one single chicken breast. Of course, we also had two vegetables and a fruit plus bread, but that piece of chicken went a long way and didn't take long to put together.


Shepherd's Pie on the Fly


Another blogger's Shepherd's Pie (actually Cottage Pie because it's beef)
Sometimes we're in the mood for Shepherd's Pie but really don't want to put it all in a casserole and put it in the oven when it's already cooked and ready to eat, so we will make a quick pan full of what amounts to a hamburger stew (hamburger, gravy, peas and carrots) in one pan and mashed potatoes in another and serve them just that way, topping the potatoes with the stew.


Finally, there's our all-time favorite:


Burritos


Vegan burrito filling, but no recipe in the blog.
You can also use what I make as a hot chip dip, which is how I was introduced to it. I just used it a different way.
Again, I'm using hamburger. Sometimes I add onions or onion powder, but I always add salt and pepper. Once the hamburger is finished cooking, I add a can of refried beans and a cup of salsa. I stir it all together. I used to add shredded cheese in the pan as well, but my daughter has limited her dairy intake, so the cheese gets added during the assembly of the burritos. We put our own burritos together rather than have one person assemble them for us. My daughter likes to add diced tomatoes and lettuce to hers. Since I don't, I let her get those ready. It's really all ready to go in under 30 minutes. You can heat the tortillas in the microwave or individually on a flat griddle. No matter what, it's really good!

Those a few of the meals we rely on to cook up quickly and easily. I hope you like them.

Friday, April 15, 2011

Meals in Minutes - My Kind of Cooking

I hate to cook. I know that may sound strange coming from someone who loves looking at recipes, collecting cookbooks and having all sorts of convenient kitchen gadgetry on hand, but I really do. That was Mom's domain and she did not allow anyone to interfere with her while she was in the kitchen. Part of it was that the kitchen simply wasn't big enough for more than one person to work at a time. But, other than the occasional opening of jars or measuring of ingredients, she simply enjoyed the entire process too much to share.

That was fine by me. I enjoyed pursuing snips and snails and puppy dog tails more than sugar and spice. I just didn't get any pleasure out of anything that was considered “girly”. Sure, I had Barbie Dolls. I had a nurse doll at some point. But, my favorite things were Matchbox cars, models, those plastic army men you could buy with the coupon from the back of comic books, playing “hide and go guns” (a game with the kids across the street), climbing trees and The Three Stooges (in fact, I was watching them before I could say “Stooges”.) I didn't know these things were considered boy things. I just knew I was having fun. Needless to say, I didn't really get much instruction in cooking.

I hated home ec; at least the cooking part of it. I hated standing by the stove and watching over the food waiting for it to finish cooking, trying to remember to stir frequently to avoid burning. I still do. I still burn food.

It didn't improve much while I was married, other than I did learn a thing or two about how to cook certain meals without needing a recipe or without measuring every single time I made it. Not that I can do that with any recipe like my mother could, but I did become more and more comfortable with what I could do.

I did cook for my mother daily while I was her caregiver and could ask for help as needed, but mainly I just cooked what I wanted and let her be my “guinea pig” as I tried some things I'd wanted to make but couldn't because of a resistant audience. My goal became to have a meal turn out tasting like it took hours to make. I think I succeeded in many cases.

I'd like to share a few recipes with you that I made that were well-received and fairly easy and quick to put together:

My Roast on the stove
German Beer Braised Pot Roast  
1 T. oil

2 pieces of bacon
1/4 tsp. salt
1 medium onion, chopped
2 carrots, cubed
1 bay leaf
3 whole cloves
1 tsp. black peppercorns, crushed
12 oz. beer or brown ale
1 c. beef broth or bouillon to make 1 cup
2 tsp. molasses or dark beet syrup (Ruebensirup in Germany) [I felt this made the recipe a bit too sweet]
1 T. vinegar
1 T. flour
1 T. butter (I left this out - enough fat in the liquid from the meat & bacon)

Heat oil in Dutch oven. Brown roast sharply on all sides and remove. Lay the bacon on the bottom of the Dutch oven, place the browned roast on it and sprinkle with salt.

Place onions, carrots and spices around the sides of the roast. Pour the beer and the broth over the roast, then mix the vinegar with the molasses and add to the liquids. Liquids should be 1 to 2 inches deep. Place lid on pan and simmer for 1 1/2 to 2 hours, or until meat is tender.

Remove roast and cover with foil to keep warm. Strain and reserve the broth. Melt the butter in the pan, add the flour and cook, stirring, for 1 minute. Add 2 cups of reserved broth, a little at a time and stirring the sauce smooth after each addition.

Add pepper, salt, vinegar or sugar to taste.

Serve sauce (gravy) over roast. This roast is good with braised cabbage or mixed vegetables and potatoes to soak up the gravy.

This was a very good meal other than I thought it was too sweet. I'll probably reduce the molasses the next time.


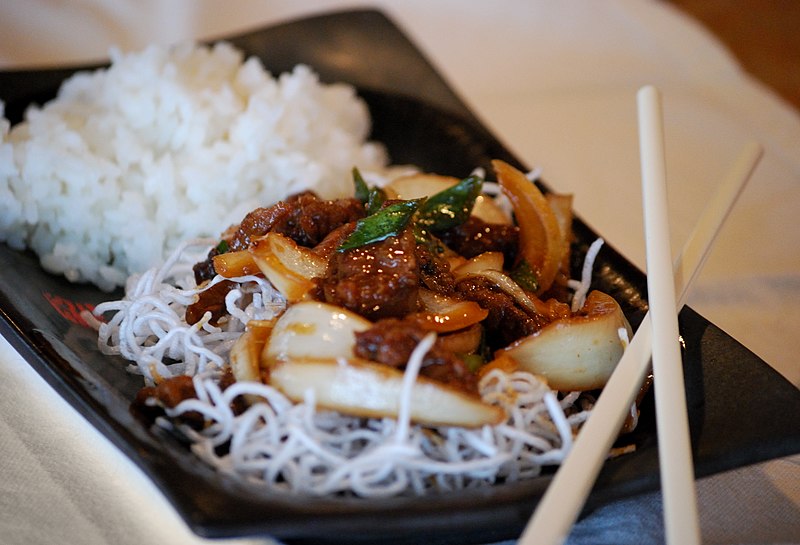
Mongolian Beef -Wikimedia Commons
Super Easy Pepper Steak 

    1 1/2 lbs. round steak
    1/4 inch thick (I cut up three 6-oz strip steaks)
    2 tbsp. soy sauce
    1/4 c. flour (I mixed this with the extra broth I added)
    3 tbsp. Wesson oil (I used olive oil)
    1 c. diced green pepper (I used about 1 1/2 cups of large diced)
    1 c. water (I used chicken broth and increased the amount of liquid)
    1 c. onions, chopped large-ish

    Cut steak into strips about 2 inches long and 1 inch wide. (Don't worry about precision - however the steak cuts up for you work with.)

    Pound the strips to help make them tender. (I didn't do this.)

    Brush soy sauce on each side of meat strips, then sprinkle with flour. (I added the soy sauce after sautéing the steak and veggies.)

    Brown steak strips in Wesson oil over medium heat.

    Add green pepper and saute a few minutes, then add water (broth).

    Cover and simmer 35 to 45 minutes until tender (Honestly, I didn't have to cook it this long - it was all done in about 30 minutes. I added the extra broth with flour mixed near the end to thicken mixture).

    6 servings.

    Hot fluffy rice belongs with this dish. (We used egg noodles because my daughter doesn't care much for rice. I prefer rice.)

Hot German Potato Salad -Wikimedia Commons

Easy Hot German Potato Salad

4 slices bacon
1 box (6oz) scalloped potatoes
1 heaping tsp onion flakes
1/2 tsp sugar
2 tbsp cider vinegar

Forty minutes before serving, fry bacon crisp and drain. Crumble bacon. Drain fat, empty potatoes into pan with seasoning; stir in 3 cups water, onion flakes and sugar; cover and cook on low for 30 minutes until potatoes are tender. Stir in vinegar and bacon bits. Serve hot.


I hope you enjoy these recipes as much as I did. They're easy to make and taste great!